Chevrolet Cavalier
Front Dash, Rear
Dash, & Door Panel Removal
Hope you find this
helpful.
Let me know:
knarfoh@knarfoh.com
After getting annoyed seeing so many posts
on how to install a deck and remove the front dash along with rear, I'm going to
once again take a load of time and write something up for you all including
pictures for the dash removal.
This should be good for 95-05 Cavaliers and Sunfires.
Front Dash removal...
I will rate this a medium on skill range. For the removal you will need the
following.
1) 7mm socket
2) Patience
Lets begin;
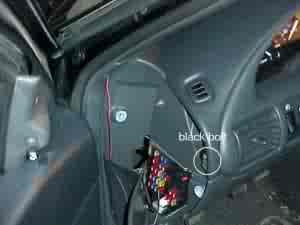
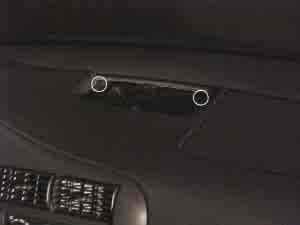
1) Take out both cover pieces at either end of the dash (pop them out with a
screwdriver) . Also remove the one bolt for each side. Placement shown by
circles on pictures.

2) Unscrew the center defroster vent on top of
the dash, then pop it up with a screwdriver and remove the two bolts underneath
it.
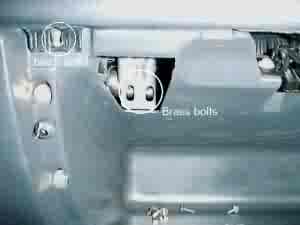
3) Open the glove box and there will be 3 bolts
(black) shown in pictures with circles. Also there are two brass bolts be
careful not to drop them.
Recessed inside an opening you will see 2 gold colored screws which are attached
to a metal piece that comes from under the airbag. Your 7mm socket is the
right size. Remove these and proceed.. the dash will come off !

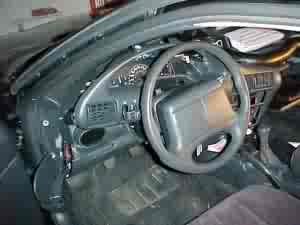
4) The dash top will now be loose and will be
able to be removed. Wiggle it loose above the gauge area because there are a few
small clips that hold it together.
5) Once the dash cover is off, you must remove the 3 bolts that hold down the
trim plate around the radio and gauges. There are also clips all the way around
it so (take your time because the trim plate will break fairly easily)
just gently pry it loose with a small screwdriver. Pull the trim plate back and
you will have access to the gauge cluster and your radio.
6) Since you don't want to cut the dimmer switch, carefully maneuver to
sit on top of the exposed vitals of the dash and be sure not to puncture the air
bag...
7) ... Reinstall in reverse order.....
If you found these
instructions helpful.. will you email me and just say so? I always
wondered who read these things: knarfoh@knarfoh.com
Aftermarket deck install....
1) With the dashed removed, there should be 2 screws holding the factory
deck in place remove these 2, and deck will slide freely out to a certain point.
2) Out of the back of the deck there is a
wire harness and antenna..
"If you have a pre-2000 car.. this doesn't apply to you
If you have a 2000+ J-Body then your factory head unit/radio/cd
player/stereo/whatever is a CLASS 2 unit. Class 2 radios are wired differently
than anything most stereo installers have dealt with.. and there's a LOT of
misinformation out there about them.
Here's EVERYTHING you should need to know about them:
1. If you remove the factory radio from the car.. you will lose your factory
door chimes and OnStar (if you even have it) . That's it! Proof.. from YOUR
owners manual:
Removing the factory deck will NOT affect your airbags (it's a separate circuit
entirely!) , your DRLs (also separate) , your cruise control (again, separate) ,
your oil change light (you don't even have one!) , your sex life (well, maybe)
...
If anyone tells you otherwise.. THEY ARE WRONG! (Feel free to tell them this.
Better yet... let me tell them this!)
2. If you WANT to keep your factory door chimes and/or OnStar... you need to
either relocate the factory deck using a T-harness or replace the factory deck
with a new module for the chimes and OnStar speaker.
3. If you don't give a crap about factory chimes.. you can buy a $15 harness and
hook it up using that! You don't have to spend $100 or more on a T-harness and
relocate the factory deck. Your airbags WILL still work.
Of course.. you'll also need a deck mounting kit.. and a GM antenna adapter..
and whatever harness you choose that you need.
Want to know more? Go to web page!

I hope that helps some of you.. remember, don't believe everything you read...
there's a LOT of misinformation out there.
Now with all that 2000+ year crap covered... The actual wiring of all this
together can be found in the install kits or when your purchase a deck from
www.crutchfield.com they send all you the info free of charge..
Rear dash removal...
1) Lower the back seat, and remove the 4 clips that hold the plastic trim
pieces to the rear dash.
2) Next, remove the 2 plastic trim pieces.
To do this, pull them slightly toward you, and angle them toward the ground. The
small clips that hold them in will pop out of place.
3) Pull the rear seat belts through the
slots in the back deck, and then pull the slots inward a bit. This will allow
the piece of rear deck that is under the sides to come free.
4) Now just start pulling, and jiggling it
a bit. You may also need to bend the center of the dash up slightly, being
careful not to crease it. It will eventually slide out.
5) If you are trying to remove the rear speakers,
simply push in the little clips that are facing you. You will need to disconnect
the speaker wire connection. The factory speakers are held in by 4 screws.
Remove those and the factory speakers will pop right out.
6) The Rear Speakers Are 6X9's, but you can
either make or buy adapters so you can use a component speaker system.
7) Reinstall in reverse.
Door panels....
1) Roll the window down. This will make replacing the door panel easier and put
things into view better
2) Remove the screw that holds the triangle-shaped plastic piece over the mirror
bolts.
3) Next, go down to the door handle grip, and remove the 2 7mm screws out of
there.
4) Go along the outside edge of the door panel and remove all those screws.
5) If you have power locks, you will need to disconnect the wires that run to
the lock switch. Simply pop the trim piece out that holds the power lock switch,
and disconnect it.
6) If you have manual windows, you will need to get the GM tool to remove the
window cranks.
7) Now the only thing stopping you is the clips that run along the top edge, by
the window. Gently pull up, and rock the entire door panel side to side.
8) When you are putting the door panels back on, be sure to get all those little
clips at the top of the door back on and make sure they are tight, otherwise the
door panel won't sit right.
With all that said.. There shouldn't be anymore posts about how to install or
remove front/rear dash, door panels or deck installation.